Wednesday, October 21, 2015

Teapots in a Box!


In this video, I took a single frame from the live video and composited a transparent water effect on top of the box in the image.  In this class, we used the Camera Matching utility in 3dsMax to overlay a model of the box on top of the box in the photo.  Then applied the Mental Ray matte shadow reflection material the sides of the box to mask only the visible inside of the box.


Here's the live video.


And, here is a summary of the steps for making the above water effect.


In the next couple of weeks we will complete a full video matchmove of the above transparent water effect in a box.  In the live video, the camera approaches someone holding a large box.  As the person opens the box, the camera pans downward into the box.  

In the next step we will attempt the full matchmove, and maybe replace the teapots with something a little more 'alive'!  So, stay tuned!

Cement Teapots!

In the last 2 classes we have been focusing more on learning how to do camera matching and compositing animations onto a still images.  Here is a camera matched composite of a 'cement teapot' onto a still image of a street scene.  The top photo is the original.  The bottom contains the composited teapot and shadow effects.


(Photo credit:  me!)


Friday, October 9, 2015

Floating Teapots!

We have been studing ways to simulate water effects for compositing into live video.  Here are some results from the last 2 classes.  These are reflection only (no transparent water) effects.


Friday, July 20, 2012

NEW CLASS


The new video special effects class starts soon!  In this 6 week session we will learn now to add smoke and fire particle effects to live video.   I will post some examples and more details about the class over the next couple of weeks.  So please check back later.

--------------------------------O--------------------------------

Here is the class advertisement that appears in the Fall 2012 issue of "Duluth Life" (the quarterly advertisement for classes hosted by Duluth Parks and Recreation).


Create Movie Special Effects
Learn how to create your own movie special effects using Autodesk 3DS Max software.   A 30-day demo software version will be provided for free.   No experience required.  Please bring your own laptop.  This is a free class.   The class meets each Thursday from 6-8PM at Bunten Park in Duluth Georgia.  The class lasts for 6 weeks starting the week of Nov 8.

Saturday, July 10, 2010

HERE'S MY FIRST CUT AT APPLYING MATERIALS TO THE SCENE

Hey guys,
I took the scene file that I sent to you yesterday.  And, I applied my own materials to the various objects in the scene.  I changed the framed picture in the scene to one that I like better.  Somehow, having the Umbrella Corp. symbol on my wall seems more 'homey' :-) Here's my finished render.
[Credits:  As I mentioned before, I downloaded this free scene file and the tutorial from here:   http://www.evermotion.org/tutorials_old/mich/minterior01.htm   We are using this in our class to practice applying our own architectural materials for the Mental Ray renderer.]

Click here to download the zip of my finished 3DS Max file of this scene.  If you haven't started yet, feel free to start with this one if you want and just change the various materials that I created.  Keep working on your final render so you can show it off in our next class.  I'll bring a photo printer so that you can print your finished rendering.

Russ

Friday, July 9, 2010

MAKING MATERIALS FOR AN INTERIOR ROOM SCENE

Hi Everybody,

In our class yesterday, we reviewed how to make several kinds of materials and textures in 3D Studio Max.  And we reviewed some basic techniques for  applying them to your 3D models.

    •  Using the “UVW Map” modifier to adjust the size and 
        position of a texture JPG on a model.  
    •  Using the “Multi/Sub-object” material type to apply two 
        materials to the same object.  
    •  Using “Bump-maps” to give a 3D bumpiness to a model’s 
        surface.

In yesterday’s class we also looked at a tutorial that I downloaded from here:  
     http://www.evermotion.org/tutorials_old/mich/minterior01.htm

We’re going to use the free download scene file from that tutorial to practice our material-making skills!   I downloaded the interior room scene file that goes with that tutorial and passed it out to you in class.   Since it uses the “Vray” renderer, I told you that I would convert it to the “Mental Ray” renderer that we are using in class and send you an email link to download it. So, here it is!   Click this link to download my zip file that contains the converted 3D Studio Max file:
              DOWNLOAD THE SCENE FILE HERE

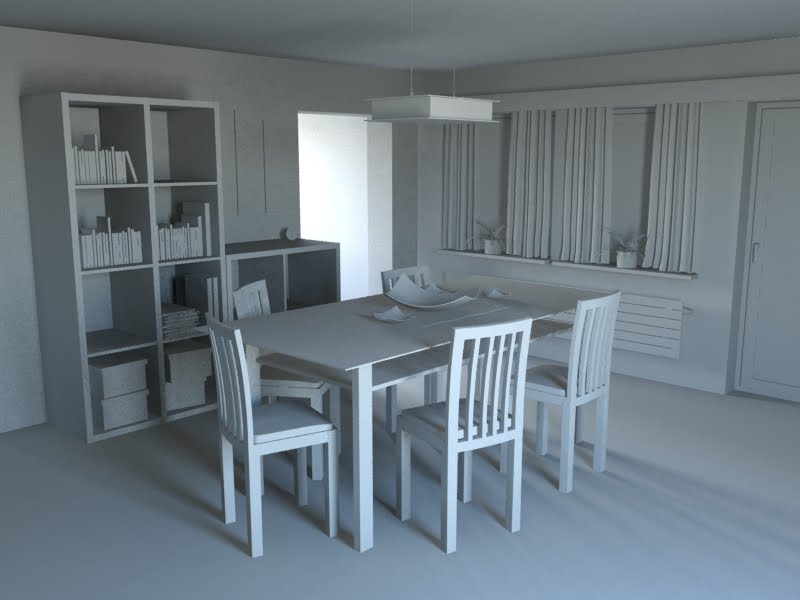
Basically, all that I did was replace all the materials with the standard off-white color material and swap out the Vray lights for mental ray lights.  So, everything has a plain off-white material applied to it.  When you render the scene file “minterior_convert2mr_02.max”, it will look  like this:


So, this week, try creating materials for each object using all the techniques we learned in the last class.  All the texture (JPEG) files that you need are in the “textures” direction in the zip file.  And, you can follow the tutorial for making some of the textures too.   I made a PDF copy of the tutorial that is also in the zip file.  When you’re done making all the materials in the scene, your scene will render something like this:


See what you can do.  Feel free to pick your own colors/textures and replace furniture models.  I’ll send another email this week as I also work through this tutorial.  Next week I’ll show you how to adjust the window sunlight, how to tweak the interior lighting, and how to get the exterior window view that’s shown in the above picture.  See you next week!

Russ

MODELING AND LIGHTING AN INTERIOR ROOM SCENE

In one of our previous classes, we practiced using various modeling techniques to make furniture and lamps for our interior scene.  And, we looked at various ways to make lighting for lamps and exterior sunlight for our interior scene.  Here are some renders that we did in class.


Thursday, July 8, 2010

CLOTH SIMULATIONS IN 3DS MAX

3D Studio Max contains tools for creating models and animation involving fabrics.  One of the tools is called the "cloth modifier". 

Students in the last class made these cloth simulation movies.

CODEBASE="http://activex.microsoft.com/activex/controls/mplayer/en/nsmp2inf.cab#Version=6,4,7,1112">
Click here to download and view full-screen.

CODEBASE="http://activex.microsoft.com/activex/controls/mplayer/en/nsmp2inf.cab#Version=6,4,7,1112">
Click here to download and view full-screen.

CODEBASE="http://activex.microsoft.com/activex/controls/mplayer/en/nsmp2inf.cab#Version=6,4,7,1112">
Click here to download and view full-screen.

CODEBASE="http://activex.microsoft.com/activex/controls/mplayer/en/nsmp2inf.cab#Version=6,4,7,1112">
Click here to download and view full-screen.

I know, I know.  That last movie frame looks like a headless blue smurf wearing a wrinkled red t-shirt and waving his arms. I should have chosen a better fabric like “iron free polyester” instead of “cotton”.  :-)

Thursday, June 17, 2010

NEW CLASS: 3D INTERIOR ARCHITECTURAL RENDERING

A NEW CLASS ON INTERIOR ARCHITECTURAL RENDERING...
Our next class session for the 3D Animation Special Effects class just started last week.  Last week, students in that class voted to do an Interior Architectural Rendering project using 3D Studio Max and the Mental Ray renderer.  We'll use 3D Studio Max to model a room, furniture, interior lighting, and materials.  We use the 3D Studio Max "cloth" feature.  And, we'll practice using Mental Ray "Final Gather" advanced rendering settings for interior lighting. As always, classes are free to anyone with an interest and a laptop that you can bring to class.  You can follow our progress for this class here on this web site.

THE XNA VIDEO GAME CLASS
The last 3D Animation class (the May-June 2010 3D Animation Video Games class) is just finishing now. You can check out what's happening in that class here:  http://xnagamers.blogspot.com/ and here: http://3drobots.blogspot.com/.   Our class project for that class was to write a multi-player network 3D video game using Microsoft's XNA gaming library and 3D Studio Max.  We decided to start a new "Team Blog" web site so that everyone in the class could post content to the blogger web site.  We're just about finished with the completed video game and the class.  Of course, a software project like this is never "completed".  There are endless great ideas and cool features to add.  But, I'll post our latest XNA game installation file and the source code on that site in a week or two.

Wednesday, March 31, 2010

COMPOSITING TUTORIAL

TUTORIAL - HOW TO COMPOSITE IN 3D
Here's a nice tutorial (PDF) that I wrote this week on compositing 3D objects into a photograph using 3D Studio Max.  We'll go through this in the next class.  Here's a picture of the composited photograph.


THE GOODYEAR BLIMP BUZZED MY HOUSE!
OK, not really :-)   This is just a fun video project that I was trying to finish for our class this week.  I'll show it to you in class.  I'm still working on it, but so far it looks very cool.  In the video, I'm doing an interview with someone standing just outside of my home, when suddenly there's a roaring sound of aircraft propellers overhead as the Goodyear Blimp does a dangerous low altitude flyover.  The Blimp is modeled in 3D Studio Max.  I used some reflective materials on the blimp and used a reflection bitmap of house roof-tops reflecting on the blimp.  I used motion blur, fog & smoke effects.  And, the composite of the blimp is through a lot of tree limbs to add to the realism.  Here's a photo of the blimp without the composite.  (Credit:  The blimp 3D model is a free download that I got from somewhere.  I'd love to give the author the credit for his model, but I can't remember where I got it.)

Our "games" class starts in 2 weeks.  But, if you have an interest in video compositing, we can spend another class session on how to do this Blimp fly-over video compositing project.

Friday, March 26, 2010

Matchmoving Animation

In our class on Thursday, March 25 2010, we did a camera matching and compositing project with a photograph and 3D objects, lighting and shadows that you created in 3D Studio Max.  I posted a couple of your pictures below.

And, here is the matchmove video  project that I demonstrated in class.  Next week we will do a very cool, very original matchmove project!  Don't miss it!
  
Video Compositing is a technique for blending computer generated video with real video from a camera.
  
Camera Matching is a technique for matching the viewing angle and viewing distance to your computer generated (CG) animation to the view in a photograph or video so that, when you composite your animation object and shadows to the photo or movie, all the angles of the objects and shadows look just right. Camera matching is importantif you want to make your picture-compost or video-composite look convincing.  In class we just matched up our CG objects and shadows to the picture by looking at it.  But, the 3D Studio Max software has built in tools for doing that.
  
Matchingmoving is a computer technique for looking at a video clip from a video camera and figuring out the camera's viewing angle and its distance to the subject and for tracking the camera's motion and shake during the video clip.  All that camera motion tracking information is then fed into your CG animation so the viewing motion and shake of your animation matches up perfectly with the live video.  In class next week we will use a free matchmoving software program to do a very cool project.
  
Here are the steps that I used to make the matchmove video shown above:
  • I started out by making a short 10 second video of a rug in my living room using a home movie camera. 
  • Using 3D Studio Max, I created a biped skeleton animation and manually matched the lighting in my biped animation to the lighting in my video clip.  
  • Next, I rigged the Kim Possible character to the biped skeleton.  
  • Then I used a freeware program called "Voodoo Camera Tracker" to calculate the camera motion-tracking information from my video clip.  I downloaded the motion tracking data into 3D Studio Max and rendered out the animation video with shadows to a video file with a black background. 
  • Then, I used a video editor to composite the animation video onto the original live video to get the  final video  of the computer generated character dancing on the carpet.
In next week's class, I'll walk you through all these steps so that you can do this on your own.

In our class on Thursday, we did a project to introduce you to camera matching and compositing.  We used the "Matte/Shadow/Reflection" metal ray material in 3D Studio Max to allow your 3D objects to cast shadows onto a transparent plane.  And then we oriented the camera view of your 3D object to roughly match that of your photo.  Here are a couple of your rendered composite images.


Thursday, March 25, 2010

Tree Modeling

Here are some renders of tree 3D models that we created in class on May 21, 2009.   The tree models were made using a free open-source program called "Arbaro" (http://arbaro.sourceforge.net/).  The pictures were rendered using 3D Studio Max and mental ray.


Playing with Caustic Lighting

Here are a few images that were created by students in class on April 2, 2009.  In this class students practiced making "caustic lighting" effects using 3D Studio Max and the mental ray renderer.  In these images, students used HDRI reflection maps, created various types of transparent and reflective materials, used lathe modeling and used the noise modifier to make some interesting caustic light effects.  This was a fun class! Great work everybody!


Wednesday, March 24, 2010

Creating and Using HDRI Reflection Maps


Here's the HDRI reflection example we created in class on April 2, 2009. That's my lovely granddaughter in the middle!


Tuesday, April 14, 2009

New 3D Animation Classes!

Hi everybody, here is the schedule for the next set of classes. The first one starts this week. The classes are free and open to anybody who has a laptop. If you want to learn how to make 3D animation movies, this class is for you. It meets 2 hours each Thursday at 6PM. The class runs for 6 weeks, followed imediately by the second free class. Here are details:

I just received confirmation from the Duluth Parks and Recreation department about the dates of my next classes. I'm teaching the classes on the following dates:

Class #1: 3D Animation for Movies
(using 3D STUDIO MAX and free version GMax)
Learn to create your own 3D animated short-movies using free 3D software for the PC. Software will be provided for free. No experience required. Please bring your own laptop. (Sorry, the free Gmax software doesn't run on Mac.)
Fee: Free class. Optional $15.00 charge for book (from amazon.com). Software will be provided free.
Session : 4/16/09-5/21/09 Thur 6PM-8PM

Class #2: 3D Animation for Games
(using MAYA and free version MAYA-PLE)
Learn to create your own 3D game mods for video game engines using free 3D software for PC or MAC. Software will be provided for free. No experience required. Please bring your own PC or Mac laptop.
Fee: Free class. Optional $20.00 charge for a book (from amazon.com). Software will be provided free.
Session : 5/28/09-7/2/09 Thur 6PM-8PM

I'm really excited about teaching the new Maya class. You will enjoy learning Maya. There's a free version that I will give to everybody in the class. To look at what students have done in previous classes, check out these two websites where I post class projects (http://3drobots.blogspot.com/ and http://filmfx.blogspot.com/).

I'm hoping for a large turnout in each class, like 30 people. Parents are welcome too. In the first class "3d Animation for Movies" that starts on Thursday we will create a stunning photorealistic video of a Goodyear blimp animation flying at low altitude right over your head. The animation video will be ray-traced. I've already completed part of the project and it looks amazing! I think you'll really enjoy the class. I hope to see you there!

The City of Duluth Parks and Recreation department allows me to teach these classes in their facilities. Classes are free. The goal of the class is to create some amazing photo-realistic rendered images and special effects video. But the main goal is to have fun.

Questions?
Email me (Russ DeWitt) at DeWitt.Russ@gmail.com.

Download the Duluth Parks and Recreation 2009 Activity Guide:
Here's a link to the web site for Duluth Parks and Recreation Department. Go to http://www.duluthga.net/dt/pub_im/newsl.html and download the "Spring 2009 Activity Guide". You can sign up at the facility at Bunten Park in Duluth, Georgia or call their phone number at 770-814-6981. Hurry, classes start this Thursday.

Directions and Map:

Here's the address of the Bunten Park facility where classes will be held. The facility is a large 2 story building. It's the building in the park, so you can't miss it.

Duluth Parks & Recreation
3180 Bunten Road
Duluth, Georgia 30096
Phone: 770.814.6981
Fax: 770.814.6987

Here are directions to Bunten Park in Duluth, Georgia:
http://www.duluthga.net/maps/bunten.html
Here's a map showing directions to Bunten Park:
http://www.duluthga.net/maps/pdf/Map_of_Duluth.pdf

Russ DeWitt
Email: DeWitt.Russ@gmail.com

Example Videos from a Previous Animation Class

Below are some examples of projects that we did in a class in September/October last year. The class project was to create a 3D animation video using 3D Studio Max and to then composite the animation with a video clip of a live actor who is interacting with it. The videos came out really well, and we had alot of fun making them.

Playing Kick-Ball
In this video, the student is kicking an array of colorful rubber balls. We created the ball animation using 3D Studio Max and Reactor. Reactor is a feature in 3D Studio Max that allows you to model the "physics" of how an object moves, so that your animation looks more like real life.
After creating the video of the balls in motion, shadows were added below each ball to match the subtle shadows of the indoor roomlight in the video of the live actor.
The video below shows the final result.
KICK BALL (FINAL)
(Sorry. For some reason, Google's video server is showing
black thumbnails on all uploaded videos today.)

Below is a solid black "matte" or "mask" video of the animation (the rubber balls). This video is used by the video editor to mask off any part of the shadows video that exists where a ball should be shown. Just like in real life, you can't see shadows that are hidden behind a solid object. So, masking those shadows off in the video editor prevents them from blending with the rubber balls in the video.

KICK BALL (MATTE ONLY)
(Sorry. For some reason, Google's video server is showing
black thumbnails on all uploaded videos today.)

Below is a video of just the room light shaddows under each of the rubber balls.
KICK BALL (SHADOWS ONLY)
(Sorry. For some reason, Google's video server is showing
black thumbnails on all uploaded videos today.)


Finally, the video below is a composit of the Matte-Mask video, the Shadows video and the rubber ball animation video.

KICK BALL (BALLS+SHADOWS ONLY)
(Sorry. For some reason, Google's video server is showing
black thumbnails on all uploaded videos today.)


Cute Bunny Animation
Here's a really cute video project that we did in the last class of a girl touching a 3D animated bunny character. In this video, the 3D animated bunny was created and animated in 3D Studio Max to match the motions of a live actor. Shadows were added to the animation to match the lighting in this video shot of the live actor.


BUNNY ANIMATION (FINAL)

BUNNY ANIMATION (NO SHADOWS)

Above is the video of the live actor composited with the bunny animation without shadows. Notice how, without shadows, the animated character seems to be floating above the ground. Adding shadows gives the viewer a visual queue to make the animation more believable to the eye.

BUNNY ANIMATION (SHADOWS ONLY)

Above is the animation that we created of just the shadows from the animated character.

BUNNY ANIMATION (MATTE ONLY)

Above is a solid black "matte" or "mask" of the animated character. The matte is used to mask over the shadows in the area where the bunny character is standing so that the shadows don't show through the character when all of these videos are composited together.

In the end, we loaded these 4 videos into the video editor:
1) The video of the girl actor without animation added
2) The animated video of the bunny character without shadows.
3) The video of the shadows only
4) The video of the mask only

After compositing the videos together in the video editor program, you can then save the video in whatever video format you want, like Apple iPod or quicktime format or windows "wmv" format. I usually save the videos in a format that will play on my iPhone so that I can show people what I did!

There are alot of steps to making a good video composite. But it's really not that difficult. Many of the hot-shot 3D exerts in the last few classes were between age 12 and 15! Anyway, we really had alot of fun.

Beam Me Up!

Here is a project that we did to introduce using a video editor program. Beam me up! This is a simple demonstration of compositing using the Premiere Elements video editor. Using a video editor allows you to mix your animation (the sparkles in this case) with your live video. Turn up your audio when you play this movie:-)


Below is the video of the sparkles only. We made the sparkles video using Photoshop.


Saturday, September 20, 2008

Class #2
Hi Everybody,
Here are a few items from Class #2.


AND THE WINNERS ARE...

I want to recognize Oliver and Fan who tied for first place in the contest to speed-model a random 3D shape that I tossed out on the table. Each of them made a GMAX model of this shape (left)... in under 60 seconds! Way to go!

Cindy came in second place. Way to go Cindy! You guys are truly movie-making 3D-model-creating GMAX gurus!

LESSON HANDOUTS:
Here are links to the 3 lesson handouts from our second class.

GMAX DEMONSTRATION FILES FROM CLASS #2:

Here are the GMAX files that we played with in class. The first one is the animation that I showed you of the bending/twisting cylinders.

  • Dancing Cylinders
    Here is the demonstration of the 'Bend Modifier' and the 'Twist Modifer' that we discussed in class and in the Lesson 5 PDF download file (above).


  • Dog Animation
    The 'Dog Animation' download file is the bend/twist demonstration that I showed you in class using a 3D model of a dog. We used the bend modifier to "wag" the dog's tail. And we used the twist modifier to make the dog shake his head.


  • CREDIT:
    This 3D Model was borrowed from the book-CD of the book that we are using in this class: "The GMAX Bible" by Murdock.


  • Butterfly Animation
    I didn't get a chance to show you this one. It's an animation of a 50 foot Butterfly sitting on the Brooklyn Bridge :-D I made the wings using the extrude modifier discussed in the Lesson 3 PDF download file from Class #1. Play with it if you have time. See if you can understand how I made the different parts. I'll show you everything about it in the next class.


  • Solar System
    This file is for the next class. You may want to download and play with it for now. It shows how to rotate objects around another object (like the planets around the sun).


    The Sun

    Oh...The sun in a mass
    of incandescent gas,
    a giant nuclear furnace,
    converting Helium
    into Hydrogen
    at a temperature
    of millions of degrees. Author Unknown

  • Spiky Thingy
    Ummm... OK. So, it's a spiky thingy.
    Oliver was making objects like these, so I just put this up there for fun to show you what you could do my dragging vertices and surfaces away from a sphere.


WHAT WE WILL DO IN CLASS #3:
In the next class we will learn how to use the material editor to "paint" textures and colors onto your models. I'll show you some really cool animation tricks to make your models look and move more real. Also, we will install the free 3DS Max 30-day demo program. And, I'll demonstrate how to render your animation to a movie file so you can make a movie of your animated model. And, we'll begin discussing what you want to do for the class project. (We have to use the demo program to render to movies because the free GMAX program can't render. So, sad... but, hey, it's free!)

I'll see you next week!
Russ DeWitt

Saturday, September 13, 2008

Class #1

Hi Everybody,
I hope you all enjoyed the class!
Here are some additional downloads for you.

INSTALLING GMAX:
Here's the link to install the GMAX software to install on your computer: http://www.turbosquid.com/gmax. Just click on the "Download GMAX" green button on that web page. Install the program, and answer the questions. It should give you your own license key to type into GMAX. Cindy just installed in on her computer without any problems. During the installation, it prompted her to enter some information about herself, and then it displayed a Serial Key value to type into the GMAX program. This seems to be the easiest method to install. Let me know if you have any problems with it.

UFO LANDING ANIMATION:
Here's the completed UFO Landing animation that we created in class. I composited our animation with live video. And, I added a title and some minor video effects to blend things in.

Play the movie above, or download one of these higher resolution versions:

Here's the same video above with animation-only.

And, here's the same video without the animation.
It's my back yard. I added "realism" to the video using a red light-bulb and a hair dryer :-D

Click the "Comments" link below and let me know what you think!

LESSON HANDOUTS:
Here are links to the 3 lesson handouts from our first class.

WHAT WE WILL DO IN THE NEXT 5 CLASSES:
Here's a summary of what we will cover in the next 5 classes.

  • CLASS#1: INTRO TO GMAX & ALL MODELING TECHNIQUES
  • CLASS#2: ADV MODELING AND INTRO ANIMATION
    - Practice more modeling techniques
    - Learn animation techniques and how to animate a character
    - Do a really cool class project: Create a character animation and render it to a video.
  • CLASS#3: MATERIALS, LIGHTS, RENDERING, RAY-TRACING USING 3D STUDIO MAX (DEMO)
  • CLASS#4: INTRO TO VIDEO EDITOR & COMPOSITING (i.e. mixing live video with your computer animation)
  • CLASS#5: CLASS PROJECT
  • CLASS#6: CLASS PROJECT

I'm really looking forward to this class. This class is all about having fun and doing something that you will love doing. We will do a class project for the last 2 sessions. So, be thinking about some short film ideas that you would like to do.

Russ