Saturday, July 10, 2010

HERE'S MY FIRST CUT AT APPLYING MATERIALS TO THE SCENE

Hey guys,
I took the scene file that I sent to you yesterday.  And, I applied my own materials to the various objects in the scene.  I changed the framed picture in the scene to one that I like better.  Somehow, having the Umbrella Corp. symbol on my wall seems more 'homey' :-) Here's my finished render.
[Credits:  As I mentioned before, I downloaded this free scene file and the tutorial from here:   http://www.evermotion.org/tutorials_old/mich/minterior01.htm   We are using this in our class to practice applying our own architectural materials for the Mental Ray renderer.]

Click here to download the zip of my finished 3DS Max file of this scene.  If you haven't started yet, feel free to start with this one if you want and just change the various materials that I created.  Keep working on your final render so you can show it off in our next class.  I'll bring a photo printer so that you can print your finished rendering.

Russ

Friday, July 9, 2010

MAKING MATERIALS FOR AN INTERIOR ROOM SCENE

Hi Everybody,

In our class yesterday, we reviewed how to make several kinds of materials and textures in 3D Studio Max.  And we reviewed some basic techniques for  applying them to your 3D models.

    •  Using the “UVW Map” modifier to adjust the size and 
        position of a texture JPG on a model.  
    •  Using the “Multi/Sub-object” material type to apply two 
        materials to the same object.  
    •  Using “Bump-maps” to give a 3D bumpiness to a model’s 
        surface.

In yesterday’s class we also looked at a tutorial that I downloaded from here:  
     http://www.evermotion.org/tutorials_old/mich/minterior01.htm

We’re going to use the free download scene file from that tutorial to practice our material-making skills!   I downloaded the interior room scene file that goes with that tutorial and passed it out to you in class.   Since it uses the “Vray” renderer, I told you that I would convert it to the “Mental Ray” renderer that we are using in class and send you an email link to download it. So, here it is!   Click this link to download my zip file that contains the converted 3D Studio Max file:
              DOWNLOAD THE SCENE FILE HERE

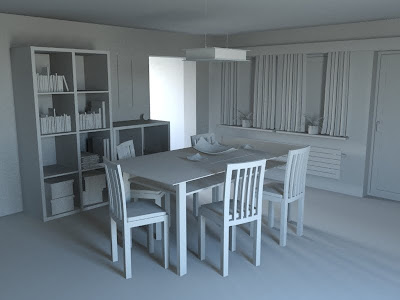
Basically, all that I did was replace all the materials with the standard off-white color material and swap out the Vray lights for mental ray lights.  So, everything has a plain off-white material applied to it.  When you render the scene file “minterior_convert2mr_02.max”, it will look  like this:


So, this week, try creating materials for each object using all the techniques we learned in the last class.  All the texture (JPEG) files that you need are in the “textures” direction in the zip file.  And, you can follow the tutorial for making some of the textures too.   I made a PDF copy of the tutorial that is also in the zip file.  When you’re done making all the materials in the scene, your scene will render something like this:


See what you can do.  Feel free to pick your own colors/textures and replace furniture models.  I’ll send another email this week as I also work through this tutorial.  Next week I’ll show you how to adjust the window sunlight, how to tweak the interior lighting, and how to get the exterior window view that’s shown in the above picture.  See you next week!

Russ

MODELING AND LIGHTING AN INTERIOR ROOM SCENE

In one of our previous classes, we practiced using various modeling techniques to make furniture and lamps for our interior scene.  And, we looked at various ways to make lighting for lamps and exterior sunlight for our interior scene.  Here are some renders that we did in class.


Thursday, July 8, 2010

CLOTH SIMULATIONS IN 3DS MAX

3D Studio Max contains tools for creating models and animation involving fabrics.  One of the tools is called the "cloth modifier". 

Students in the last class made these cloth simulation movies.

CODEBASE="http://activex.microsoft.com/activex/controls/mplayer/en/nsmp2inf.cab#Version=6,4,7,1112">
Click here to download and view full-screen.

CODEBASE="http://activex.microsoft.com/activex/controls/mplayer/en/nsmp2inf.cab#Version=6,4,7,1112">
Click here to download and view full-screen.

CODEBASE="http://activex.microsoft.com/activex/controls/mplayer/en/nsmp2inf.cab#Version=6,4,7,1112">
Click here to download and view full-screen.

CODEBASE="http://activex.microsoft.com/activex/controls/mplayer/en/nsmp2inf.cab#Version=6,4,7,1112">
Click here to download and view full-screen.

I know, I know.  That last movie frame looks like a headless blue smurf wearing a wrinkled red t-shirt and waving his arms. I should have chosen a better fabric like “iron free polyester” instead of “cotton”.  :-)

Thursday, June 17, 2010

NEW CLASS: 3D INTERIOR ARCHITECTURAL RENDERING

A NEW CLASS ON INTERIOR ARCHITECTURAL RENDERING...
Our next class session for the 3D Animation Special Effects class just started last week.  Last week, students in that class voted to do an Interior Architectural Rendering project using 3D Studio Max and the Mental Ray renderer.  We'll use 3D Studio Max to model a room, furniture, interior lighting, and materials.  We use the 3D Studio Max "cloth" feature.  And, we'll practice using Mental Ray "Final Gather" advanced rendering settings for interior lighting. As always, classes are free to anyone with an interest and a laptop that you can bring to class.  You can follow our progress for this class here on this web site.

THE XNA VIDEO GAME CLASS
The last 3D Animation class (the May-June 2010 3D Animation Video Games class) is just finishing now. You can check out what's happening in that class here:  http://xnagamers.blogspot.com/ and here: http://3drobots.blogspot.com/.   Our class project for that class was to write a multi-player network 3D video game using Microsoft's XNA gaming library and 3D Studio Max.  We decided to start a new "Team Blog" web site so that everyone in the class could post content to the blogger web site.  We're just about finished with the completed video game and the class.  Of course, a software project like this is never "completed".  There are endless great ideas and cool features to add.  But, I'll post our latest XNA game installation file and the source code on that site in a week or two.

Wednesday, March 31, 2010

COMPOSITING TUTORIAL

TUTORIAL - HOW TO COMPOSITE IN 3D
Here's a nice tutorial (PDF) that I wrote this week on compositing 3D objects into a photograph using 3D Studio Max.  We'll go through this in the next class.  Here's a picture of the composited photograph.


THE GOODYEAR BLIMP BUZZED MY HOUSE!
OK, not really :-)   This is just a fun video project that I was trying to finish for our class this week.  I'll show it to you in class.  I'm still working on it, but so far it looks very cool.  In the video, I'm doing an interview with someone standing just outside of my home, when suddenly there's a roaring sound of aircraft propellers overhead as the Goodyear Blimp does a dangerous low altitude flyover.  The Blimp is modeled in 3D Studio Max.  I used some reflective materials on the blimp and used a reflection bitmap of house roof-tops reflecting on the blimp.  I used motion blur, fog & smoke effects.  And, the composite of the blimp is through a lot of tree limbs to add to the realism.  Here's a photo of the blimp without the composite.  (Credit:  The blimp 3D model is a free download that I got from somewhere.  I'd love to give the author the credit for his model, but I can't remember where I got it.)

Our "games" class starts in 2 weeks.  But, if you have an interest in video compositing, we can spend another class session on how to do this Blimp fly-over video compositing project.

Friday, March 26, 2010

Matchmoving Animation

In our class on Thursday, March 25 2010, we did a camera matching and compositing project with a photograph and 3D objects, lighting and shadows that you created in 3D Studio Max.  I posted a couple of your pictures below.

And, here is the matchmove video  project that I demonstrated in class.  Next week we will do a very cool, very original matchmove project!  Don't miss it!
  
Video Compositing is a technique for blending computer generated video with real video from a camera.
  
Camera Matching is a technique for matching the viewing angle and viewing distance to your computer generated (CG) animation to the view in a photograph or video so that, when you composite your animation object and shadows to the photo or movie, all the angles of the objects and shadows look just right. Camera matching is importantif you want to make your picture-compost or video-composite look convincing.  In class we just matched up our CG objects and shadows to the picture by looking at it.  But, the 3D Studio Max software has built in tools for doing that.
  
Matchingmoving is a computer technique for looking at a video clip from a video camera and figuring out the camera's viewing angle and its distance to the subject and for tracking the camera's motion and shake during the video clip.  All that camera motion tracking information is then fed into your CG animation so the viewing motion and shake of your animation matches up perfectly with the live video.  In class next week we will use a free matchmoving software program to do a very cool project.
  
Here are the steps that I used to make the matchmove video shown above:
  • I started out by making a short 10 second video of a rug in my living room using a home movie camera. 
  • Using 3D Studio Max, I created a biped skeleton animation and manually matched the lighting in my biped animation to the lighting in my video clip.  
  • Next, I rigged the Kim Possible character to the biped skeleton.  
  • Then I used a freeware program called "Voodoo Camera Tracker" to calculate the camera motion-tracking information from my video clip.  I downloaded the motion tracking data into 3D Studio Max and rendered out the animation video with shadows to a video file with a black background. 
  • Then, I used a video editor to composite the animation video onto the original live video to get the  final video  of the computer generated character dancing on the carpet.
In next week's class, I'll walk you through all these steps so that you can do this on your own.

In our class on Thursday, we did a project to introduce you to camera matching and compositing.  We used the "Matte/Shadow/Reflection" metal ray material in 3D Studio Max to allow your 3D objects to cast shadows onto a transparent plane.  And then we oriented the camera view of your 3D object to roughly match that of your photo.  Here are a couple of your rendered composite images.


Thursday, March 25, 2010

Tree Modeling

Here are some renders of tree 3D models that we created in class on May 21, 2009.   The tree models were made using a free open-source program called "Arbaro" (http://arbaro.sourceforge.net/).  The pictures were rendered using 3D Studio Max and mental ray.


Playing with Caustic Lighting

Here are a few images that were created by students in class on April 2, 2009.  In this class students practiced making "caustic lighting" effects using 3D Studio Max and the mental ray renderer.  In these images, students used HDRI reflection maps, created various types of transparent and reflective materials, used lathe modeling and used the noise modifier to make some interesting caustic light effects.  This was a fun class! Great work everybody!


Wednesday, March 24, 2010

Creating and Using HDRI Reflection Maps


Here's the HDRI reflection example we created in class on April 2, 2009. That's my lovely granddaughter in the middle!